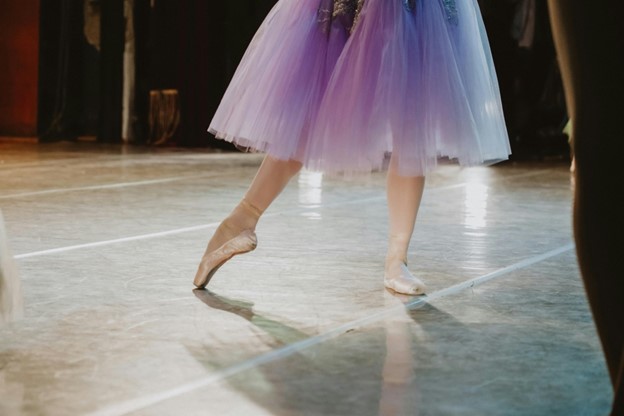
No doubt, your aspiring dancer has dreamed for years of lacing up her first pair of pointe shoes, rising onto the tips of her toes, and floating across the stage, effortless and graceful. That first moment en pointe is eagerly awaited—and painstakingly earned. But before she can start practicing her pirouettes and fouettes, your dancer must pass another milestone: her first pointe shoe fitting.
This guide will equip you with the knowledge to navigate this exciting transition and help your child get started on an exhilarating journey through artistic expression en pointe. We’ll look at:
- how instructors determine that a student is ready for pointe work;
- the anatomy of a pointe shoe (get ready to learn some new vocabulary!);
- what to expect at the actual fitting;
- how to prepare a new pair of pointe shoes for use;
- how to tell when a pair of pointe shoes is worn out; and
- some recommendations for accessories for your dancer’s pointe shoe bag.
Is your dancer ready for pointe shoes?
Ballet instructors carefully assess a student’s readiness for pointe work. They will consider factors including years of study, ankle strength, stability, technical proficiency, and age—students are usually about 11 or 12, but individual development is more important than the actual number. Waiting to be approved for pointe work can be painful, but going up on your toes too early has the potential to hurt even more; pointe work on unprepared feet can lead to serious injuries.
Anatomy of a pointe shoe
A pair of pointe shoes is a work of art. Each pair is meticulously handcrafted by experienced artisans. But the magic lies beneath the surface.
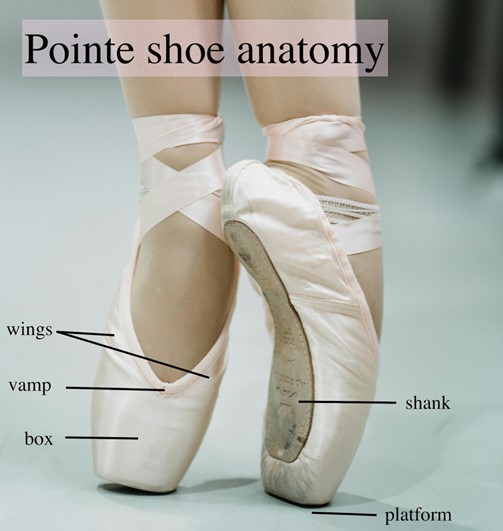
The shank
The “spine” of a pointe shoe is the shank, a supportive insert that holds the dancer up on her toes. Shanks are usually made out of layers of cardboard and thick leather, and will eventually break down—though there are some models available with more durable, synthetic shanks. Any given pointe shoe model will usually come in several different shank hardnesses, including super soft, soft, medium, hard, super hard, or custom. As the names imply, each variation offers a different degree of flexibility. Dancers who are just starting out will likely begin with a softer shank, but they will quickly develop a preference. Dancers with a very strong and flexible arch will eventually require hard shanks, as their strong feet will break the pointe shoe quickly. The right shank choice depends on your dancer’s foot strength, technique, and personal preference—which is likely to change as she gains experience.
The vamp
The vamp comes in two main shapes: U-shaped and V-shaped. The U-shaped vamp has a wider opening that dips across the instep, while the V-shaped vamp has a deeper, more central cut. The height of the vamp also varies. The best vamp for a particular dancer depends on the structure of the foot. A low vamp is more suitable for lower insteps, allowing more flexibility in the front of the shoe. A high vamp is suitable for higher insteps, giving more support in the front of the shoe. Your dancer should try both types on during her first pointe shoe fitting to see which she prefers. Ultimately, the best vamp shape depends on your child’s individual foot anatomy and personal preference.
The box
The box of the pointe shoe is the rigid compartment at the front that encases and supports the toes. It is constructed of densely packed layers of sacking fabric and glue, or sometimes synthetic materials. Pointe shoe boxes come in a range of shapes. Tapered boxes narrow toward the bottom, offering a more pointed look. A square box will be broader, with more room for the toes. The right box for a dancer depends on the shape of the toes.
It is important to try on shoes with different boxes during the first fitting to determine which one suits best. For example, if your dancer feels too much pressure on the big toe, causing pain, her weight is likely not being evenly distributed and the box is too square. On the other hand, if all the toes feel uncomfortably smushed inside the shoe, the box is probably too tapered. Getting the box right is very important, as the wrong fit can lead to incorrect placement, damage to the first metatarsophalangeal (MTP) joint, painful and persistent blistering, and toenail bruising or loss.
The platform is the bottom of the box, the flat area on which the dancer balances en pointe. The platform shape will depend on the box shape.
The wings are the sides of the show that come up from the box, stabilizing the ankle.
The importance of an in-person first pointe shoe fitting
If you take only one thing away from this article, let it be this: Your dancer must be fitted for her first pointe shoes in person, at a reputable brick-and-mortar dance shop that offers professional pointe shoe fittings.
Do not order your first pair of pointe shoes online. Not only that, but we actually do not recommend ordering pointe shoes online at all unless the dancer has been fitted multiple times, over a period of many months, and has a very solid understanding of her size. The reason for this is that all pointe shoes are handmade, and the same shoe, in the same options and size, may fit slightly differently as a result.
The role of the professional pointe shoe fitter is crucial here. Fitters are trained to assess the dancer’s foot and offer appropriate options. They can recommend shank hardness, vamp shape, box design, and wing height. As the dancer grows and matures in technique, she may find that the shoe she has been dancing on is not ideal for any of a number of reasons. An experienced fitter can help troubleshoot and try a different shoe at the next fitting. Fitters can also address any specific concerns you might have and ensure the shoes are properly fitted and adjusted for optimal support and comfort. This personalized approach simply can’t be replicated through a computer screen and a size chart.
What to expect at the first pointe shoe fitting
The fitting will likely take about an hour, and your dance shop should confirm appointment length at the time of booking. Your dancer should come to her first fitting wearing tights under her street clothes, and a pair of comfortable, stretchy shorts or pants so that she can move her legs easily. You’ll likely want to take photos, so take that into account when she is choosing what to wear.
Padding
Most dancers use some kind of padding inside the shoe, and they must wear this padding during the fitting. Pointe shoes are fitted very closely (this is one shoe you do not buy with room to grow), so if your dancer isn’t wearing padding during the fitting, the padding won’t fit into the shoe later. Types of padding include toe pads—which cup the toes and may be made of gel or fabric—and lambswool, which can be stuffed into the bottom of the shoe to create some cushioning. Some ballet instructors have a preference about what kind of padding their students use. If your dancer’s teacher does not, start out with a pair of toe pads. You can get these at the shop when you go for the fitting.
Trying on the shoes
The fitter will choose a few different options to start with. The first thing you may notice is that none of the options have elastic or ribbon attached to them. You must purchase them separately, and the dancer must hand-sew them on herself. The reason for this is so that the dancer can attach elastic and ribbon in a way that supports the fit of the shoe the best. There are various types of ribbon and elastic and various ways to attach them to the shoe, and each dancer eventually develops a preference. It’s a good idea to ask about this at the first pointe shoe fitting; the fitter will likely have advice on a custom approach to give your dancer the best fit.
The fitter will instruct the dancer to try on a pair of shoes, plie, and go up en pointe. He or she will ask how it feels. Does the dancer feel like she is sinking or that she can feel the floor? This means that the shoe is too big or the box is too wide. Are the toes pinched and painful? The shoe may be too small or the box too narrow. Expect to try on multiple brands and models of shoes during the first fitting. Don’t be shy about asking to see more—it’s important to do due diligence now; pointe shoes cannot be returned after the ribbons and elastics have been sewn on, which must happen before your dancer can wear the shoes to class. There are many reputable pointe shoe brands. Brands that our dancers wear include, but are not limited to: Nikolay, R Class, Suffolk, So Danca, Virtisse, Bloch, and many, many more.
NOTE: Virginia Ballet Company and School instructors require that students who are relatively new to pointe bring in their unsewn shoes so that the teacher can check the fit. Even if your child’s teacher does not require this, it is well worth asking for a fit check. Then, if something is amiss, you can return the shoes before they are sewn, reducing both the risk of injury and wasted expense.
Cost
This isn’t what anyone wants to talk about, but no guide to a first pointe shoe fitting would be complete without discussing it. Pointe shoes are pricey. They will usually run you over $100 per pair, and that’s not counting all the accessories (see below). Many stores operate loyalty programs where you get a free pair after you’ve bought a certain number. We highly recommend joining such a program, even if it takes a year or two to claim your reward. It may be tempting to hop onto Amazon and buy a cheap pair of pointe shoes (which may be very tempting, especially as they often come with all the accessories). Don’t do it. The money you’ll save is not worth the inevitable injury and foot problems that are likely to result from dancing on ill-fitting shoes.

Accessories to buy at your first pointe fitting
In addition to the actual pointe shoes, your dancer will need ribbons and elastic. You only need to buy enough for this one pair of shoes. Ribbons can be stretchy or non-stretch woven satin. Elastics come in different widths and some dancers use a single strap per shoe, while others use two per shoe and sew them on in a criss-cross shape. Woven satin ribbons can actually be reused easily by removing them from the previous shoes and sewing them to the new shoes. Even if she prefers not to do that, your dancer may want to try something different the next time. If you’re not sure how to sew them on, your fitter can show your dancer where to attach them on the shoe for the best fit.
You will also need a needle and thread for sewing on the ribbons and elastic. While you do not need to purchase a cute little sewing kit at the dance shop, it’s a good idea for your dancer to have one in her bag. Any ribbons that have been sewn in haste will inevitably begin to come off in class.
Speaking of which, your dancer will need a pointe shoe bag. We recommend a purpose-designed mesh bag, which you can also pick up at the dance store, because this will allow the shoes to breathe and dry faster after use (because yes, they will get sweaty, and they won’t smell great).
Finally, it’s a good idea to pick up some gel pads and/or toe tape so that your dancer can apply extra protection to her feet as needed to prevent blisters. But don’t go buying too much of any one product in the beginning, as she may find it doesn’t work well for her needs. You should be able to pick up all these items at the store during the first pointe shoe fitting.
How to prepare the pointe shoes for use
Pointe shoe ribbons are generally sold in packs of two. You need to cut each length in half so that you have four pieces total—two for each shoe. Singe the end of the ribbon that won’t be sewn to the shoe with a lit match or lighter. This melts the fabric so that it won’t fray. There are many different ways to sew on the ribbon and elastic, so we won’t go into detail about that here. And make sure they are sewed on securely.
As your dancer advances, she will develop her own preferences for how to prepare her shoes for use. Some dancers like to bend their shanks to break them in a little before putting them on. Others darn their platforms for stability. Still others may sew little darts into the shoe to prevent gaping. There are many, many ways to customize a pair of pointe shoes.
But for now, simple is best. Just sew them, and she’s ready to go!
How to tell when your dancer’s pointe shoe is dead
The time investment in the first pair of pointe shoes is significant, but the honeymoon period is short. Pointe shoes have a limited lifespan. There are some guidelines out there that will say a pointe shoe should last 10-15 hours of dancing, but this is highly dependent on both the shoe itself and the dancer. Professional ballerinas can wear out a shoe in a single performance—or in half a performance. On the other hand, if your dancer is a beginner and only doing an hour of pointe work a week, the first pair of shoes could easily last months.
In any case, this section is somewhat misnamed. If you weren’t a dancer yourself, you may never be able to tell when your child’s pointe shoes need replacing. The dancer herself should be able to tell—and this is also something that teachers will keep an eye out for in beginning pointe classes.
Nevertheless, here are some signs a shoe is dead:
- The shank has broken down and is floppy, and is too weak to support the dancer en pointe. Dancing on a broken shank will put your dancer at great risk of injury.
- The platform has softened and the dancer can feel the floor. This is a recipe for bruised toenails and joint pain due to reduced shock absorption.
- The box and wings are soft and don’t hold the dancer up anymore; she feels like she is sinking and there is a lot of pressure on the big toe. This affects alignment and can cause injury.
Once the shoe has been confirmed to be dead, it’s time to head back to the pointe shop and repeat the whole process again.
Summary and Key Takeaways
Taking your child to their first pointe shoe fitting is an exciting milestone on their ballet journey! But before you get swept up in the magic, it’s crucial to ensure a safe and supportive start. Here’s a quick recap of the key takeaways from this guide:
- Ready for pointe? Age is just one factor. Your dancer must wait for instructor approval before going on pointe.
- The importance of a professional fitting: Pointe shoes are not one-size-fits-all. There is no substitute for an in-person appointment at a dance shop with an experienced pointe shoe fitter.
- The essential pointe shoe kit: In addition to the actual shoes, your dancer will need padding, sewing items, and a ventilated bag to hold everything.
- Preparing the shoes: After you buy the shoes, it’s time to sew them!
- Knowing when to retire a shoe: Dancing on dead shoes is a recipe for injury. It’s important to recognize the signs of a “dead” shoe, such as a weak shank, worn platform, or softened box.
By understanding these key points, you can empower your child to embark on their pointe journey safely and with confidence.
At Virginia Ballet Company and School, our dance instructors carefully evaluate each student for readiness for pointe work. The decision to place a student en pointe is not based solely on age, but incorporates factors including strength, class attendance, and technical proficiency. Our instructors check each student’s shoes before they are sewn to ensure proper fit and prevent injury.
Whether your dancer is already en pointe and looking for a new studio, or if you have a beginning student who dreams of pointe shoes, we have a class for you. Check out our class offerings and contact our office today to schedule a placement.